Lavenders 5 Minute S&P 500 eMini Day Trading Chart Explanation
Post on: 9 Апрель, 2015 No Comment

Lavender’s Cheat Sheet for the Simple 1-2-3 Advanced Trading Workshop
Components of a Price Bar on a Chart
Bar charts can be time-based, tick-based or volume-based. When using time-based data resolution (intraday, daily, weekly, or monthly), each bar on the chart illustrates the Open, High, Low, and Closing prices for the time increment represented by the bar. When using tick-based data resolution, each bar illustrates the first, lowest, highest, and last tick in the group of ticks comprising the bar. When using volume-based bars, each bar illustrates the first, lowest, highest and last price in the group of transactions comprising the bar.
The price range between the open and close is plotted as a rectangle on the single line.
If the close is above the open, the body of the rectangle is white.
If the close is below the open, the body of the rectangle is red.
Basic candlestick = Open. High, Low, and Close
Tick bars — Tick-Based Chart
Tick bars plot the price of each transaction. Tick bars differ from time-based bars because tick bars plot prices based on a transaction-by-transaction basis while time-based bars plot prices during a specified time period, regardless of the time that has elapsed. A transaction can represent 100 shares, 200 shares, 1,000 shares, and so on. When plotting tick bars, price and number of ticks are the only factors used, as time and volume are not considered.
For example, you can create a 5-tick chart, where one bar is comprised of the Open, High, Low, and Closing ticks for each set of 5 ticks. The length of time in that 5-tick bar could be a few seconds, a minute, an hour, or even a day. In a tick-based data interval, the time it takes to record 5-ticks is of no relevance and is not represented in the bar—each bar will contain the range of open, high, low, and closing prices for a specified number of ticks.
Volume or Share – based Chart
Volume or share bars plot based on a user specified # of shares that are actually traded. They are not based on ticks (transactions) or time. Each candle will always represent the same specified number of shares actually traded. For example — when plotting a 500 share bar on a chart the number of candles that may be plotted in any 1 minute may be one or many or it could take 10 minutes or more to plot one candle. Periods of high volume then will be represented by numerous candles and conversely periods of low volume will be represented by few candles.
Linear regression
Linear regression is a statistical tool used to predict future market values relative to its past values. Linear Regression is a concept also known as the least squares method or best fit. Linear Regression attempts to fit a straight line between several data points in such a way that distance between each data point and the line is minimized.
This function calculates the slope and angle of a linear regression line, and also determines the value of the line on the current bar or a specified number of bars ago or projected bars into the future.
Linear Regression Curve
Market Synopsis
Linear regression is a statistical tool used to predict future market values relative to their past values, and is normally plotted on a price chart as a straight line like a trendline. The Linear Regression Curve indicator, however, does not plot a straight line – when it is plotted, it curves through price activity. Its curve is a result of plotting a line through each end point of invisible linear regression trendlines. Each invisible trendline plots the minimal distance between closing prices, using the least squares method, over the number of bars defined in the input, Length.
The indicator helps to determine where a market’s price might be in the near future using current and past price history. If prices are trending up, linear regression attempts to logically determine what the upward bias of the price may be relative to the current price. If prices are trending down, it will attempt to determine the downward bias of the price. Some analysts believe that when prices rise above or fall below the linear regression line, they are overextended and will begin to move back towards the line. Thus, the line is used to monitor when a price move may change direction.
TRIX — Triple Exponential Average Indicator
Calculates the percent rate-of-change of a triple exponentially smoothed moving average of the item’s closing price. Usage
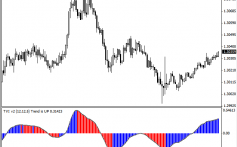
TRIX is a momentum indicator that displays the percent rate-of-change of a triple exponentially smoothed moving average of the item’s closing price. The TRIX indicator oscillates around a zero line. Its triple exponential smoothing is designed to filter out noise.
Market Synopsis
The Triple Exponential Average (TRIX) indicator is an oscillator used to identify oversold and overbought markets and it can also be used as a momentum indicator. As is common with many oscillators, TRIX oscillates around a zero line. When used as an oscillator, a positive value indicates an overbought market while a negative value indicates an oversold market. As a momentum indicator, a positive value suggests momentum is increasing while a negative value suggests momentum is decreasing. Many analysts believe the TRIX crossing above the zero line is a buy signal while closing below the zero line is a sell signal. Also, divergences between price and TRIX can indicate significant turning points in the market.
TRIX calculates a triple exponential moving average of the log of the Price input over the period of time specified by the Length input for the current bar. The current bar’s value is subtracted by the previous bar’s value. This prevents cycles shorter than the period defined by Length input from being considered by the indicator.
Two main advantages of TRIX compared to other trend-following indicators are its excellent filtration of market noise as well as its tendency to be a leading rather than a lagging indicator. It filters out market noise using the triple exponential average calculation thus eliminating minor short-term cycles that may otherwise indicate a change in market direction. Its ability to lead a market stems from its measurement of the difference between each bar’s smoothed version of the price information. When interpreted as a leading indicator, TRIX is best used in conjunction with another market timing indicator to minimize the effect of false indications.
Bollinger Band (Simple Function)
The BollingerBand function calculates an n standard deviation (StdDev) line (usually 2 StdDevs) above or below a center-line simple moving average. By using a number of standard deviations within the normal distribution range of values, the BollingerBand adjusts for price volatility.
Normally BollingerBands are used with price data, but they can also be used with indicators and other calculated values.
The BollingerBand function can be interpreted in many ways and can be used in multiple time frames. The traditional interpretation would look for a bar to cross over one of the bands and then cross back over, signaling a potential market reversal.
TRADER’S TIPS
Stocks and Commodities Magazine, Issue: February, 2004 pg. 96 Article: Using the Heikin-Ashi Technique by Dan Valcu
Heikin-Ashi: A Better Candlestick.
Most profits (and losses) are generated when markets are trending—so predicting trends correctly can be extremely helpful. Many traders use candlestick charts to help them locate such trends amid often erratic market volatility. The Heikin-Ashi technique—average bar in Japanese—is one of many techniques used in conjunction with candlestick charts to improve the isolation of trends and to predict future prices.
Calculating the Modified Bars Normal candlestick charts are composed of a series of open-high-low-close (OHLC) bars set apart by a time series. The Heikin-Ashi technique uses a modified formula:
xClose = (Open+High+Low+Close)/4
o Average price of the current bar
xOpen = [xOpen(Previous Bar) + Close(Previous Bar)]/2
o Midpoint of the previous bar
xHigh = Max(High, xOpen, xClose)
o Highest value in the set
xLow = Min(Low, xOpen, xClose)
o Lowest value in the set
Constructing the Chart
The Heikin-Ashi chart is constructed like a regular candlestick chart (except with the new values above). The time series is defined by the user—depending on the type of chart desired (daily, hourly, etc.). The down days are represented by filled bars, while the up days are represented by empty bars. Finally, all of the same candlestick patterns apply.
Chart by Educofin.com
Here is a Heikin-Ashi chart:
Chart by Educofin.com
Putting It to Use
These charts can be applied to many markets; however, they are most often used in the equity and commodity markets. Traders often program these new instructions into existing trading programs, such as MetaTrader, or use many online tools (listed in the reference section below). Finally, it can be applied via Microsoft Excel or other similar spreadsheet programs.
There are five primary signals that identify trends and buying opportunities:
Hollow candles with no lower shadows indicate a strong uptrend: let your profits ride!
Hollow candles signify an uptrend: you might want to add to your long position, and exit short positions.
One candle with a small body surrounded by upper and lower shadows indicates a trend change: risk-loving traders might buy or sell here, while others will wait for confirmation before going short or long.
Filled candles indicate a downtrend: you might want to add to your short position, and exit long positions.
Filled candles with no higher shadows identify a strong downtrend: stay short until there’s a change in trend.
These signals show that locating trends or opportunities becomes a lot easier with this system. The trends are not interrupted by false signals as often, and are thus more easily spotted. Furthermore, opportunities to buy during times of consolidation are also apparent.
Conclusion The Heikin-Ashi technique is extremely useful for making candlestick charts more readable—trends can be located more easily, and buying opportunities can be spotted at a glance. The charts are constructed in the same manner as a normal candlestick chart, with the exception of the modified bar formulas. When properly used, this technique can help you spot trends and trend changes from which you can profit!
Here are some additional resources: Heikin-Ashi TradeStation Addon Heikin-Ashi MetaData Addon
By Justin Kuepper
Heikin-Ashi Explained
by Howard Arrington
The February 2004 issue of ‘Technical Analysis of Stocks and Commodities’ magazine contains an article by Dan Valcu titled ‘Using The Heikin-Ashi Technique’. Too often traders hear about a technique and think the ‘holy grail’ train is leaving the station and they rush to get on board without taking time to understand what it is all about. The purpose of this article is to comment in greater detail on the visual presentation created by the mathematics of the method.
Mr. Valcu says that ‘heikin’ in Japanese means ‘average’ and ‘ashi’ means ‘bar’. So a literal translation would be ‘average bar’. Indeed, the method employs an averaging technique as follows:
haClose = (Open + High + Low + Close) / 4
haOpen = (haOpen(previous bar) + haClose(previous bar))/2
haHigh = Maximum(High, haOpen)
haLow = Minimum(Low, haOpen)
Now for those who have pulled out the Valcu article and compared his formulas with those given above, please do not be too quick to claim that I made a mistake in plagiarizing the formulas. My formulas are equivalent and it represents one of the criticisms I have.
haHigh and haLow
Mr. Valcu’s formulas in the article were give as:
haHigh = Maximum(High, haOpen, haClose)
haLow = Minimum(Low, haOpen, haClose)

It is mathematically impossible for the haClose to be higher than the bar High, or lower than the bar Low. haClose is an average of the bar’s open, high, low and close. The open must be in the high-low range. The close must be in the high-low range. The low must be equal to or lower than the high. Therefore, the haClose can never be higher than the High, nor lower than the Low.
Because the haClose can never be higher than the High, the Heikin-Ashi High does not need to test for the haClose as a possible price that would set haHigh. Choosing the higher of High and haOpen is sufficient. The same reasoning applies to picking a price for the Heikin-Ashi Low. Choosing the lower of Low and haOpen is sufficient. haLow does not need to consider haClose because haClose will never be lower than the Low.
I consider it unfortunate that Mr. Valcu did not understand these principles before he published his article. And, every programmer who published script code to implement Heikin-Ashi in their charting package used the Valcu formulas with scripts similar to this example:
haHigh = MaxList( H, haOpen, haClose);
haLow = MinList( L, haOpen, haClose);
Not one of the twelve programmers who published scripts in Stocks and Commodities magazine pointed out that testing for haClose is unnecessary because it is an impossibility. It does not hurt to test for it, but it is an unnecessary step. Missing something obvious like this makes me wonder just how much serious thinking is being made to understand what this technique is all about. Now, let’s leave that issue and continue with the analysis.
haClose
The Heikin-Ashi Close is the average of four bar prices: open, high, low and close. This creates an interesting effect in strongly trending markets which I feel is misleading for chart readers. Let me illustrate the effect with the following example.
The example shows the original bar data in the top half of the chart, and the Heikin-Ashi method in the bottom half. Ensign Windows was used to prepare the examples. Bars 1 through 4 are strongly trending up, and bars 5 through 8 are strongly trending down. Now permit me to point out several things by comparing the two images.
The Heikin-Ashi data points are also shown on the original chart using small red dots, connected by solid red lines through the highs and lows, and a dotted red line through the closes. These dots and lines will aid in the comparison of what Heikin-Ashi is doing to ‘average’ the original bar data.
In an Up candle the haClose will always be below the actual close, and in a Down candle, the haClose will always be above the actual close. These two principles are illustrated by comparing the position of the close red dots to the bar closes in the Original chart image. In fact, haUp candles will ALWAYS have a high wick, and haDown candles will ALWAYS have a low wick. This is a built in behavior that may surprise most Heikin-Ashi candle readers. It is one of the primary areas I feel is misleading.
Note: haUp candles may or may not have a low wick. haDown candles may or may not have a high wick.
A wick on the top of a regular Up candle implies that selling pressure has moved the market back down from the high. Thus, I consider it misleading to see a high wick on a Heikin-Ashi up candle when no selling pressure is present. The inverse applies to low wicks. A wick on the bottom of a regular Down candle implies that buying pressure has moved the market off of the low. Again, it is misleading using conventional interpretation for low wicks to be present on a Heikin-Ashi down candle when no buying pressure is present.
Mathematically the haClose can never exceed 75% of the original bar’s range. 75% would be achieved when the Open and the Close occur at the extreme of the bar’s High. In that case, haClose = (H+H+H+L)/4. Simple example: O=4, H=4, C=4, L=0, so haClose = 12 / 4 = 3 So the maximum haClose value is 3/4th of the range because the range was 4. Thus the high wick size in an Up candle will be 25% of the original bar range or greater. The low wick size in a Down candle will be 25% of the original bar range or more.
In the Chartpoint Magazine, No. 12 (2003), Yashuji Yamanaka gives five rules for trading the Heikin-Ashi charts. His Rule 2 reads, ‘Positive candle with upper shadow means strong BUY’, and ‘Negative candle with lower shadow means strong SELL’. I have proved out that every haUp candle must have a high wick, and every haDown candle must have a low wick. Therefore, Rule 2 would have EVERY Heikin-Ashi candle be either a ‘strong BUY’ or a ‘strong SELL’. This obviously is not the case, so I must conclude that Yamanaka’s Rule 2 is an illogical statement.
The haOpen formula can be stated more simply as the midpoint of the prior Heikin-Ashi bar’s candle body. See the graphical illustration of this where the cyan lines from the prior bar’s candle body range point to the candle body midpoint. This midpoint is used as the open of the following Heikin-Ashi bar.
The haOpen can be outside of the original bar’s range. Therefore, the range of the Heikin-Ashi bar is extended to include the haOpen price. This extension is done by choosing the higher of High and haOpen for the haHigh, and the lower of Low and haOpen for the haLow. Mr. Valcu describes this process as eliminating ‘irregularities from a normal chart’, and creating a ‘better picture of trends’. My opinion is that this process is creating misleading perceptions. Let’s look again at the example.
One misperception in the Heikin-Ashi chart is the absence of gaps. There are 6 gaps in the original chart and they have all been ‘averaged’ out of the picture. If gaps mean something to you either as an indication of momentum or a price level that will eventually be filled, you will have to do without that insight when you use Heikin-Ashi charts.
Another misperception in the Heikin-Ashi chart is the length of the bars. In our example many of the HA bars are twice as tall as the original bars. HA bars will always overlap a portion of the bar on its left-hand side. In the up trending portion of the example, the HA Lows are all lower then the original lows, giving the impression the market traded at prices during that time period when no such trading occurred. As an example, consider bar #3. The original bar price range is from 700 to 740. The Heikin-Ashi bar implied that during the #3 time period, the trading was from 640 to 740. That is misleading. The visual presentation does not make any differentiation between the portion of the range that is actual and the portion that is invented.
Another misperception is the combination of bar #4 and bar #5. On the original chart, these two bars make a formation known as a Key Reversal Pair. That significant information is totally lost in the Heikin-Ashi chart. In fact, bar #5 on the HA chart is shown as an Up candle which is 100% opposite what actually happened. That too is misleading in my opinion.
Summary
I guess by now you have concluded I am not overly impressed with the Heikin-Ashi method. It may be serving a beneficial purpose for many of you, and if so, that is wonderful. I encourage you to continue using what works for you. Heikin-Ashi charts are included in Ensign Windows because users asked for it. But, I do not know if it is going to help anyone trade more profitably. Seasoned trader Ira Tunik recently stated, ‘There are those that are constantly looking for the Holy Grail and [think] every new or revived study or tool is necessary. Over the years I have found that the majority of the exotic, complicated and supposedly new studies don’t help anyone’s trading ability or profitability.’
Whatever the case may be, at least by reading and understanding the points made in this article you will be using the Heikin-Ashi method better informed about how it is creating ‘average bars’.
Commodity Channel Index
The CCI function, is calculated by determining the difference between the average price of a commodity and the average of the average prices over some number of bars.
This difference is then compared to the average difference over the same time period, to factor in the commodity’s volatility. The result is then multiplied by a constant that is designed to adjust the CCI so that it fits into a normalized range of about +/-100.
Traditionally there are two basic methods of interpreting the CCI, looking for divergences, or treating it as an overbought/oversold oscillator. Remarks
The CCI value usually does not fall outside the -300 to 300 range and is normally in the -100 to 100 range.
The value for the Length input parameter should always be a positive whole number greater than 0.
Market Synopsis
The Commodity Channel Index Average, like the Commodity Channel Index, is used primarily to identify beginning and ending of cycles in futures markets and is commonly used to identify buy and sell opportunities. The CCI is calculated so that 70-80% of all price activity falls between +100 and -100 on its vertical scale. Many analysts believe a long position is indicated when the CCI exceeds +100 while a short position is indicated when the CCI falls below -100 but these values should be based more on your market analysis. For example, you may decide that for the market you are evaluating, a -125 indicates taking a short position while a +150 indicates taking a long position.
Many analysts also use this indicator to indicate overbought and oversold markets, much like an oscillator. Breakouts above the OverBought line indicate an overbought market and breakouts below the OverSold line indicate an oversold market. The CCI often misses the early part of a new move because of the amount of time it spends in the neutral position (between the OverBought and OverSold lines). Many analysts believe the CCI Average crossing above or below zero identifies market conditions before the OverBought and OverSold lines are crossed.
CCI (Commodity Channel Index)
The Commodity Channel Index, which can be used effectively for stocks, not just commodities, was developed by Donald Lambert. It is meant to decipher a stock’s trendiness. The faster the indicator is moving the stronger the trend is, and if the CCI bounces around in a small range, it simply indicates the lack of a trend.
The CCI can be used as an overbought/oversold indicator. Readings above 100 imply an overbought situation and a possible pullback while readings under -100 imply an oversold condition and a possible reversal bounce.
The CCI can also be used as a divergence. If a stock makes a new high but the CCI fails to follow suite, a warning is given that a pullback is likely.
This QQQ chart shows how CCI can be used as an overbought/oversold signal. The indicator is not perfect, but if you bought when the CCI fell below -100 and then moved up and sold when the CCI moved above 100 and then fell, you would have done pretty well.
Here is another example of the CCI being used to determine entries and exits. Again, it’s not perfect, but when used with other indicators, it has a place in your technical analysis library.
There are inherent risks involved in trading stocks and commodity futures with real money. You should be aware of the risks involved and use the material contained in this website and in any downloaded materials at your own risk. You should consider your own financial condition before trading commodities or stocks with real money.
The material contained and/or downloaded from this website is believed to be reliable, but Marshall J. Jones, nor any of his associates guarantee its accuracy or validity, nor are they responsible for any errors or omissions which may have occurred. None of the materials on or from this site provide, imply, or otherwise constitute a guarantee of performance. Your own trading results may differ. It should not be assumed that future results will be profitable or will equal past performance, real, indicated or implied.
CFTC RULE 4.41 — HYPOTHETICAL OR SIMULATED PERFORMANCE RESULTS HAVE CERTAIN LIMITATIONS. UNLIKE AN ACTUAL PERFORMANCE RECORD, SIMULATED RESULTS DO NOT REPRESENT ACTUAL TRADING. ALSO, SINCE THE TRADES HAVE NOT BEEN EXECUTED, THE RESULTS MAY HAVE UNDER-OR-OVER COMPENSATED FOR THE IMPACT, IF ANY, OF CERTAIN MARKET FACTORS, SUCH AS LACK OF LIQUIDITY. SIMULATED TRADING PROGRAMS IN GENERAL ARE ALSO SUBJECT TO THE FACT THAT THEY ARE DESIGNED WITH THE BENEFIT OF HINDSIGHT. NO REPRESENTATION IS BEING MADE THAT ANY ACCOUNT WILL OR IS LIKELY TO ACHIEVE PROFIT OR LOSSES SIMILAR TO THOSE SHOWN.