Creating a Mechanical Trading System Part 1 Technical Indicators
Post on: 20 Май, 2015 No Comment

How to program the building blocks of a mechanical trading system: creating technical indicators
- Download source — 829 B
Introduction
This article explains how to code technical analysis indicators on the .NET platform using the C# language. This is the first step towards creating a fully automated trading robot that does not depend on any underlying platform to perform its tasks. The final product will receive quotes directly from a broker via an API, perform price analysis, and decide whether or not to place orders to buy or sell.
The code provided here is part of a larger project to create a backtesting platform and an automated FOREX trading robot. The source code for this project is available here .
This will cover the implementation details of the Exponential Moving Average, and the Moving Average Convergence Divergence (MACD) indicators. These two indicators have been chosen to exemplify how modular design and object oriented programming can help create complex indicators out of simple ones.
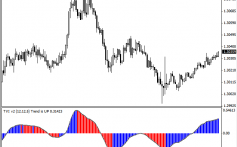
The MACD indicator has been chosen for this article since it produces a rather distinct entry signal based on its two lines crossing. This article does not advocate taking the crossovers both as entry and exit signals since this indicator is lagging and produces signals once the trend has changed. The entries provided by this indicator should be complemented with exit techniques based on other indicators. Of particular interest are exits described by Charles Le Beau using the Average True Range indicator such as the Chandelier and Yoyo Exits.
Background

The nature of the final product, a trading robot, demands that the indicators are coded with real time signals in mind. Each indicator has four important methods:
- Constructor. Initializes the object and instantiates any other indicators needed.
- ReceiveTick. Informs the indicator that a new value has been received. The indicator can now store it in an internal buffer, or perform computations with the new value
- Value. Returns the value of the indicator. This method uses the internal buffer filled by ReceiveTick to compute its data.
- IsPrimed. Returns true when the indicator has received enough values to start producing a meaningful output. For example, a 14 period simple moving average will not return output values until 14 input values are received.
The MACD indicator is constructed with three EMAs. A slow (longer period) EMA and a fast (shorter period) EMA both receive the current price. The difference from the fast and slow EMAs is called the MACD, and is sent to a third EMA called the Signal. The values plotted in the chart are the MACD and the Signal. By instantiating three EMA objects and defining the relationships between them, a more complex indicator such as the MACD can be easily created.
Indicators have to be instantiated first with the proper parameters. Then the ReceiveTick method needs to be called with a value. To obtain the result from the indicator, the Value method needs to be called. This method returns a value of 0 if not enough values have been received. The IsPrimed method can be called to determine if the indicator has received enough values to compute a value.
Note that the ReceiveTick method can either receive price data, or data from another indicator. This flexibility is what enables the MACD indicator to be built from three Exponential Moving Average objects.
Source Code
Credits
The image in this article was obtained with a product that includes software developed as part of the NPlot library project available from here.